Thursday, July 30, 2015

New Job so push pause

In the next couple of days i will be starting my new job in the IT field. I have mixed emotions about it but sometimes you have to do the right thing not the easy one. With that currently in the mix i have been trying to button up everything else going on in the background. The envelope has been sitting dormant for the past month and will likely be the case for August.

Through this project i have been ticking away living at home reaping the benefits of very generous parents. Ballooning seems to drain you of all your funds especially when your not doing any flying. At least nobody else is flying at the moment. That would push me over the edge if people were flying and i couldn't because all my money was going into getting setup. 

I recently paid a Cameron Balloons bill of $450 for the PRV's, basket bolts and a couple other goodies. Today i spent $400 getting the fabric for a basket cover, targets, bag material, tank covers and misc basket items. Expensive but if you were to purchase all these items it would cost at minimum triple the raw material cost. 

Lots is happening in the garage at the moment and i hope once i show everyone exactly how much work i have put into making it look/function well they will be thoroughly impressed. I remember about a year ago i was living on noodles because i was putting every cent into getting parts for the balloon. To get started well its not cheap even if your going to route i'm taking. Id hate to see the money being dropped for a manufacturers rig. Hopefully within the next couple of weeks ill be able to pay back my debt to my brother and sort the remaining $800. Once that is all sorted ill be out of the noodle phase once again and be faced with lots of labor.
The cheap fan i purchased has been stripped and sent off to be powder coated. Once it arrives back hopefully the gas tank will be painted up and it can all go back together.

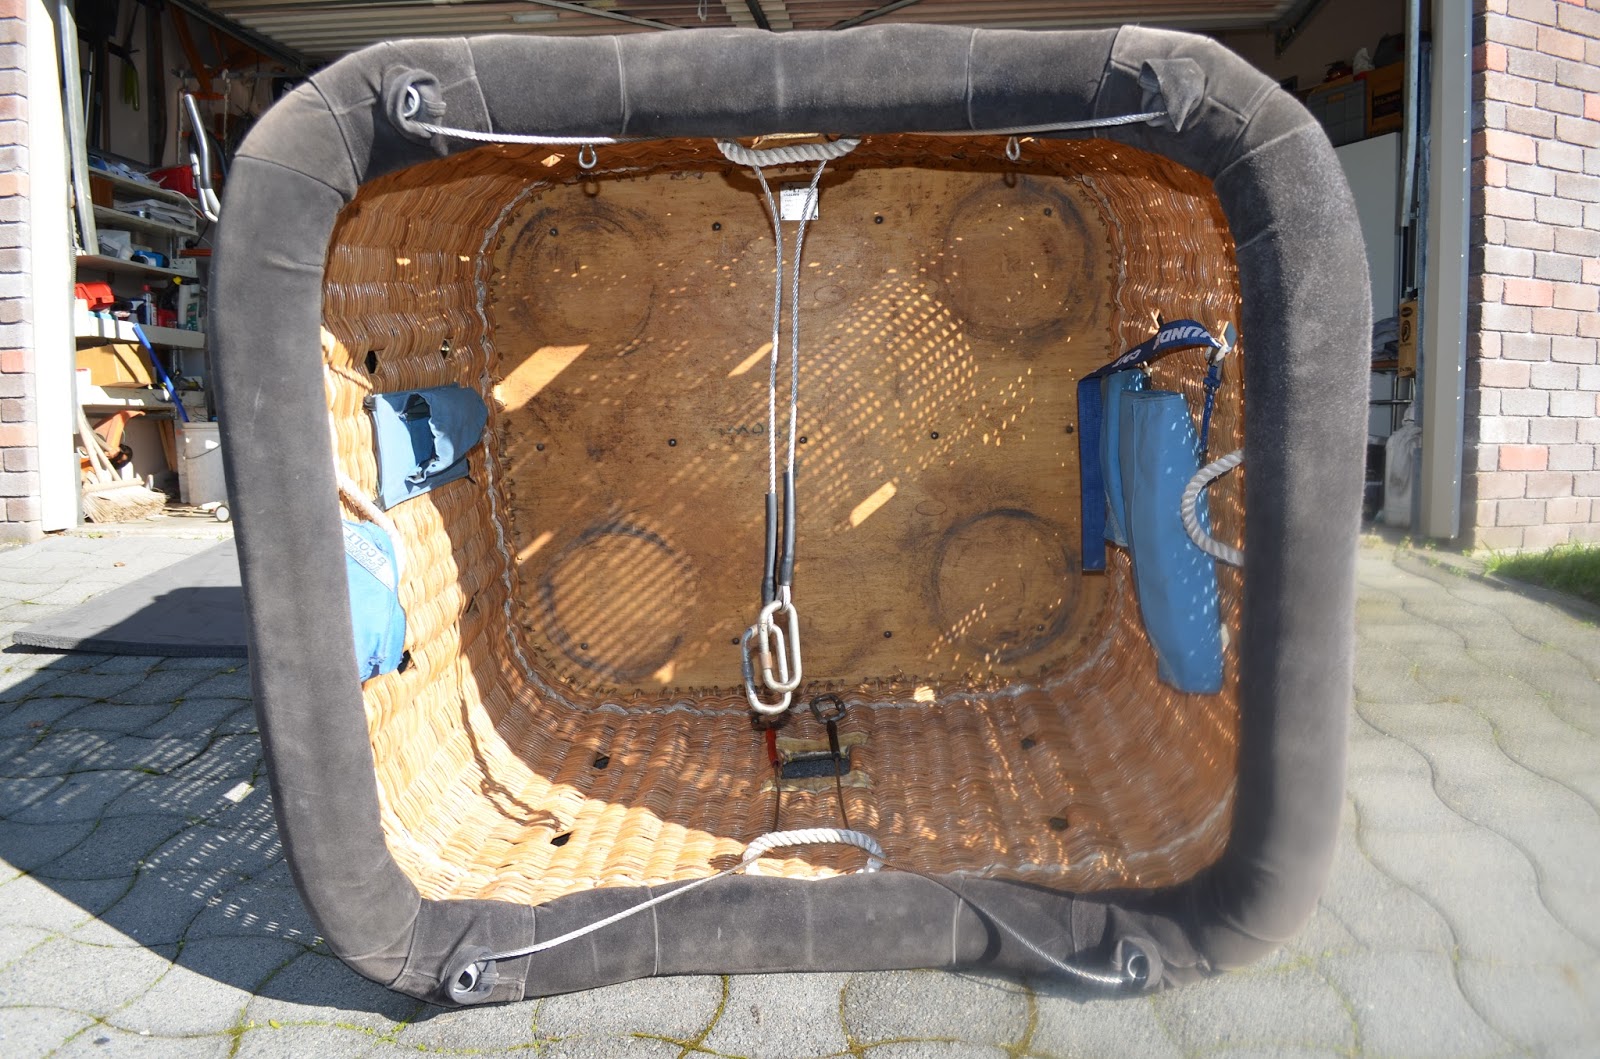
Lastly we finally got the bottom end together after the frame came back from the stainless steel cleaners. It is crazy to think that its the same frame. Very similar result to the tanks i polished myself. It wasn't until after that you look back and realize what 20 plus years will do to your system. Once we got it all together we had a little bit of play then got straight back to work getting the foam flooring cut and carpet fitted.

Lot happening part II


Ok onto the second part of the chaos i call balloon building. So after cleaning the basket i bought it home to dry off. It seems a couple things had been done to the basket early on like the hide being coated in varnish and also the bottom of the basket seemed to have the signed of varnishing also.


When i got it home i noticed where mainfreight staff had tagged the basket it had gone though onto the wicker which took a lot of rubbing to remove most of it. As i mentioned in the previous post i took a lot of before pictures to show how much work i had done and what difference can be made with a little time/effort.

So i got this stuff called leather cleanser which apparently takes a layer off the leather. It worked alright i did notice the water being a different colour but all up it didn't make much of a difference to the raw hide. I followed this up by using tanners oil which soaks into the leather making it supple, waterproof and durable. That has made made a bit more of a difference. The leather is taking the oil and seems to be a little more lively. I have done about 3 coats and i will follow up with one or two more just to make sure its well hydrated.

The wicker when the basket arrived was a little dry but had good colour. Its always interesting the variety of methods that get thrown around to care for your basket and i guess it comes down to personal preference. I went for the more traditional way of caring for my basket which is using natural linseed oil. It is very slow drying which gives the wicker a lot of time to absorb the moisture. After about two coats its made a drastic improvement to the colour and strength of the basket.

A fan came in the basket. It is pretty rough but i have managed to pull it to pieces. The motor has been pulled to bits for general cleaning and checking over everything. It looks like cleaning up the surface rust, installing a new gasket seal, greasing of the bolts and a lick of paint on the tank  was all the motor needs.


Whilst giving the basket a once over i noticed the basket bolts were a lightly rusted so they have been removed and new bolts have been ordered. After 26 years even the most robust elements of the basket are showing its sign of age.

I have ordered fabric for the tank covers, basket cover, targets and the various basket goods. Once this arrives ill be busy back at the machine making all the elements for the basket. Sadly if i don't sort out all the bits of the basket prior to putting it into service it will likely go incomplete for all the unessential elements.

Lots happening part I

So last week my basket arrived along with a few other items inside. It has been pretty chaotic with everything going on but i have been slowing working my way through getting everything up to par.

So basket a Colt 77 built in 1989 which is in amazing condition for its age. It came with a map bag, fire extinguisher holder and dropline/pouch. All of the bits are pretty old so i have ordered fabric to sew up what i need.

The dropline is about 15mm wide which will be a pain to handle if i need to use it, so i will probably cut it up and use it elsewhere in the balloon. I have a spare dropline so that will be installed in the balloon once i have made a bag for it to go in.

The map bag was very solid and about the size of a piece of A3 paper so i have no idea what i would use it for so that's going to be replace with a flight manual holder. I have no idea what i will do with the bit that have come with the basket but they have a little historical reference so ill put them into storage.


Enough with the plans so the basket arrived on a Thursday. I took before photos of how i got it. It came covered in a Sky balloons cover which was tagged by Mainfreight staff which annoyed the shit out of me because any logical person could see its not something designed to be disposed. So opened it all up and pulled everything out so i could take it into get steam cleaned and wet vac'd.


surprisingly the basket was dirty and a floor of dirty water came out. The suede was in good condition its had a little bit of use which is evident on the down side of the basket. I plan to swap the down side to the up to give everything equal use. Its just a matter of looking after everything and giving it some love.

That is part one of the last couple of weeks so stand by for part two.

Friday, June 26, 2015

New Toys!

When i was initially looking for a bottom about a year back i had a couple of hopeful leads which didn't work out which was very disappointing. I didn't end up getting my dream basket so i had to cast my view further abroad. Finally i came across a basket i liked which is slightly bigger than i had hoped but not a bad size overall. I ended up changing a couple of benchmarks i set for example i am not a fan of the riveted on suede on a T&C baskets and a couple other minor cosmetic items. 
Its not all negative i managed to get an amazing burner that has some cool history. I am looking forward to seeing how it performs but i am almost certain its the best solution for New Zealand's 60/40 Propane/Butane mix. All liquid feed is a big bonus for me also. I can nitro my tanks if required plus i dont have to worry about having the master or slave juggling act.
My tanks are quick shut off V-30's made in 1992 they are amazing tanks which i guess goes to show much like the Stratus they did make some really nice components. I have three of the suckers which essentially means 2 hours flights will be easy going.
So onto my new toys... i got my tanks recently which is awesome, sadly there is a little bit of work involved in getting them up to standard. The tank covers are in good condition but id like to make new ones to fit with the colour scheme which sounds stupid but its only a bit of material and time to make it look a thousand times better. Sadly they are out of date which adds to the cost of getting them ready for action. Lastly the foam they have used if horrible its essentially particle board foam! It has no real structural integrity and has a little bit of damage so sadly another cost involved.
I have started the process of cleaning up the stainless tanks so next step is testing followed by new prv's, foam, covers, rego fitting covers and a arrow to help remember the dip tube direction. 

Saturday, June 13, 2015

Smashed Another Milestone

Been ticking away at the sewing machine on my weekends. I am slowly struggling more and more for space which is concerning considering i just hit half way. Total the balloon has about 300+ seams to sew 260 of these are the gores going together which i have just passed my 130th seam. Hopefully it will line up when the gores get sewn together. Until that stage ill keep sewing along.

With the basket arriving soonish i am trying to plan out what i need to sort once its here. I have gone to Hamilton Canvas and picked out fabric's for the bag, basket cover, tanks, dropline, fire extinguisher and basket organizer. It helps to think of these side projects as i can process any potential issues that may arise so essentially a couple of things have been tweaked to make them work better.
I always get annoyed when balloon owners over think their kit. A couple of balloons have baffled me because crewing on them is such a complicated ordeal its like your first day crewing on a balloon. With that being said i don't want my balloon to be anything like this and i hope what i end up with ends up being functional yet simplistic. i HAVE to fit a dropline, fire extinguisher, Manual and First aid kit. simple enough task but what i want to fit in is another story. So in the basket i WANT to fit is a slot for markers, place to hook radios, drink bottle slot, junk slot and tablet slot that is also removable. After a reshuffle it should all fit in but ill have a lot of work to sew it up.
Almost forgot to mention the burner is now back together with its brackets for the frame and i even did a little polishing on the hose connections. They came up pretty good considering it took 10 minutes to make it 100 times better . Top one is cleaned the bottom one isn't so lucky yet...

Saturday, May 23, 2015

Ticking Along

So been ticking along with the balloon. Sadly its either all throttle or nothing at all. Some days i sit down at the machine and smash out a 10 panels. Others everything goes wrong and i put it down for a week. Friday's seems to be the day for progress however that can be totally ruined with issues coming up or the folder not playing ball.


My basket has shipped from England. Its a pretty 77 T&C to go with some V-30's and my Stratus single. Should be a nice set up once i have finished modernizing a couple of the components. Ill be a busy man sewing up new everything. One thing my dad has taught me is always look after and be proud of your gear. So it will be locked away getting it right before it gets put into action.

On the sewing front i had a very productive day managing to sew 15 panels yesterday which put me to a total of 65 panels also known as 1/4. If everything plays ball we should get a couple more done today. Katie is righting my wrongs by taking each row of panels out of the individual gore rolls

On the sewing machine front the machine sometimes goes out when new bobbins are added which is no hassle. Its just a minor adjustment to get it running good again. As you can see the cotton has left behind sections of white fluff which is coating on the thread. Not sure how this will affect the balloon. I am guessing once heat is applied it will help fill any holes from where the needles have punctured. So far this hasn't affected the machine and doubt it will create an issue. Only thing is you cant go flat out on the machine which isnt an issue for me.

There are two ways to sew a balloon, horizontally or vertically. So what is the difference?
Vertically you sew together A-B-C-D to complete a gore which was the original plan and creates less clutter because you can store a gore once its complete (Big plus with the space i am working with).
Horizontally you sew the balloon left to right (A-B-A-B-A-B) but everything stays as individual gores. The big let down is space is tight because you are working on large sections of fabric for long periods of time but you know where to tension each panel to make it fit together better and you end up mastering a row. Another big plus is you can grab one sequence of panels and the next panel you are sewing and just grab whats in the heap.

I guess you can say the first balloon is the hardest as with any firsts but after the amount of set backs and knowledge i have gained the next one whenever that happens will be a breeze.

Friday, May 8, 2015

The barrier has been broken!

As i have said time and time again. Building a balloon to me is about 4 main barriers. These are making templates (Initiation of the project etc), cutting fabric, sewing fabric and all the finishing jobs to get it ready for inflation. As many of you know i have gotten hung up on the sewing part for a while now until just recently.

Towards the end of last week i sat down at the machine and played around a little bit. Managed to do a couple of seams which turned out well. Got the machine running right so i was a happy camper. With i guess ballooning firing in my gut recently i have more drive than ever before because its finally coming together. I guess you could say i see the light at the end of the tunnel and sadly for me the only thing stopping me is some hard work!

So after a couple hours of thinking it over i finally sat down at the machine and started sewing the balloon. The folder is annoying at first but once you start a panel it is an amazing tool for the novice sewer.


Actually, talking of sewing a balloon isn't sewn it is more like "industrial bonded". The reason for this is with sewing its all about beauty and it being tidy. On the slip side you have industrial bonding which is all about strength and if its tidy i guess that's a bonus. Luckily for us balloons are massive and even the professionally built balloons are filled with minor "blemishes". 

Over the years i have come to realize balloons are over engineered as i guess with all aircraft any anything you want to last for a significant amount of time. I guess things built in the 1950's are a testament to things being over engineered or built well. With that being said i have changed my mindset on how my balloon is built, Not to say it is unsafe or a weak balloon its just within parameters of tolerance and minor "blemishes" should don't affect strength.

So anyway on to what i have done over the last little while. I have managed to put together all panels A-B and halfway through B-C as of today. The machine has had some minor issues but have managed to work out most of the issues. I hope by the end i will still consider building another balloon because the next one will be super easy compared to the wealth of knowledge i have gained so far!

Monday, April 27, 2015

All Ballooned Out!

Haven't posted recently as we have been very busy over the past couple of months. First we had Wairarapa which was an amazing time and It was a great first fiesta for me followed by Waikato. Had a great time at both and felt comfortable flying with balloons around me.  
While I was in Masterton we had to get some repairs done so I met a great guy also interested in building a balloon which will turn out to be a great point of contact for me i believe. 
Lead onto Waikato where I managed to score Mitch for a few hours. We managed to sew the first panel which turned out to not be the case soon after. I found a minor screw up where I hadn't measured one side of the template right which meant I had to cut a whole new set. Luckily we managed to get out of way prior to Canowindra. 

Just before Canowindra I cut a deal to buy the last single Stratus ever made which is a bit special. It has less than 10 hours use and you can even see the bottom colour of the can. 
I picked it up in Canowindra and had a little bit of a play. So why did I buy a stratus? Its a powerful burner which all liquid set up. Vapor pilot lights to me don't really have an upside so having less hose is great. Secondly fuel, in NZ we have a horrible fuel mixture which means modern burners struggle to keep filters clean resulting in failures. In recent years i have seen this a couple times so hopefully the Stratus will chew through it.  Lastly the burner came with a mount for a firefly which is a bonus.


With one piece of bottom end sorted i now look to sort the basket and tanks.

Monday, February 23, 2015

Fiesta Season

So with fiesta season nearing i have been busy clocking up hours. Katie's balloon has a fresh airworthiness certificate so i have been giving strata some flight time as a "helpful boyfriend". Haven't flown it in 8 months so it was defiantly an experience.

A couple of things have happened in the last month. I finally sat down at the sewing machine and made a little bit of progress. The sewing machine is now set up for 4 layers of nylon. Its a hell of a process to dial it in but once its done in theory you shouldn't need to touch it. My scrap piece of fabric shows the amount of work involved in getting the tension right.

It has taken me another month to sit down again at the machine after getting everything right. I have now moved onto practicing my folding skills with the assistance of the folder. I have a few choice words to say about the french lap seam however i wont put those in writing. The professionals make it look easy but i guess it will be like riding a bicycle. After my first attempt i decided to test the strength of everything. Had the sewn fabric over a bar with my hanging and it didn't even phase it! Throw into the mix 1100kg break strain load tape and you can understand balloons are over engineered.

Sadly i have only spent about half an hour at the machine trying to fold but leading into fiesta season its time to start focusing on everything regarding flying. Looking forward to making my debut as a pilot at Wiararapa and Balloons over Waikato. I have senior pilots stepping aside to let me take their balloons out which is very daunting but its going to be a great experience and i just hope i can meet their expectations.
I have some new bits of kit in my pilot bag that i am looking forward to getting some use out of around fiesta season. Might have to do a bag breakdown at some point.

Hello 2015

Well 2014 is finally finished which is a good reason to give an update on the balloon. In December i finished up cutting the final nylon panels of the balloon. I still have a roll of nomex to cut however that will be cut later once all 20 gores have been assembled. There are a few reasons for this but the main one being nomex frays easily and the less movement it has before sewing the cleaner and easier it will be to sew. The other reason leans more towards the frustration of cutting it out.
On top of this i placed an order with Cameron Balloons for crown rings and temp flags before i left for Japan which also arrived in December. I received one last item since my last update which was a borrowed seam folder. With that crucial piece i have no excuse to not sew the balloon. I guess this is part of my procrastination but i believe once i sit down at the machine ill get a little bit done.

The panels have been sorted into their gores which will make it easier sew once i tune in the sewing machine and start the sewing of the balloon. As i have mentioned time and time again everything with balloons is super-sized including the time taken to organize everything. Took me a couple of nights just to label each corner and sort the individual panels into gores.